Contents
There comes a time when you might need to leverage the benefits a public cloud such as AWS has, to host some applications. In my day to day experience, this generally applies to public-facing web applications. There are many benefits as to why you might want to migrate such an application to AWS (more on that in another post)
If you are looking to migrate your entire VMware stack (Compute, Network and Storage) to AWS, there are other very interesting solutions which include the ability to live migrate directly into VMware Cloud on AWS via HCX.
With all that in mind, this post focuses on the steps required to migrate one or many VMware based Virtual Machines to AWS without re-architecting the application.
Pre-requisites
Before you can set up the migration software, you need an AWS user with the ServerMigrationConnector role applied.
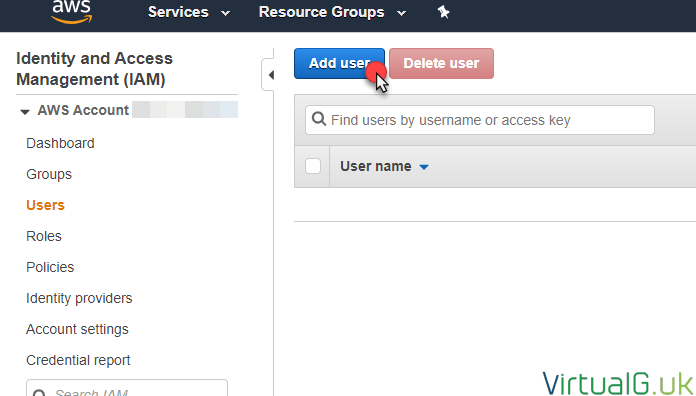
1.To configure this, open IAM>Users>Add User
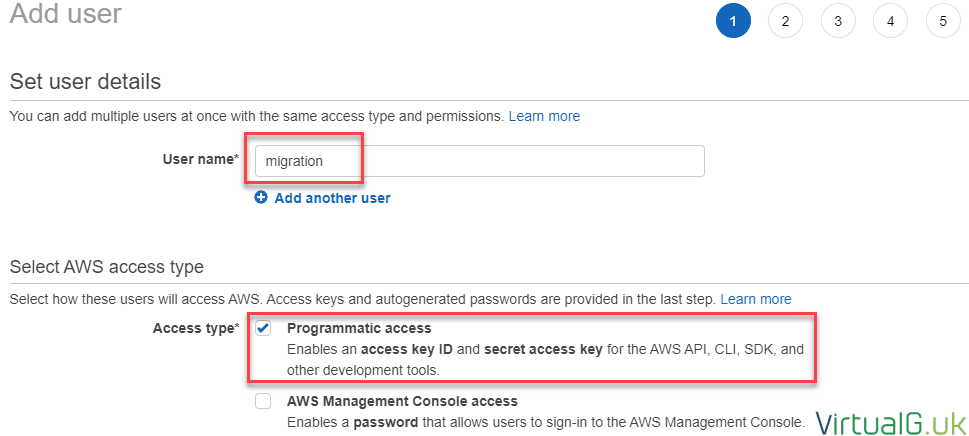
2. Give the new user a name such as: migration
3. You must specify Programmatic Access. Console access is not required:
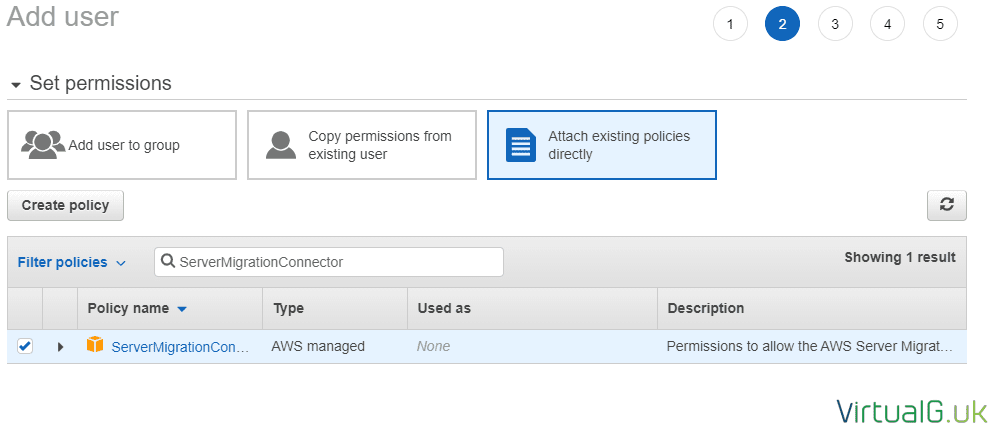
4. There are a few ways we can attach a policy to the user. Directly or via a group. For this example, there will only be one migration user so I’ll attach a policy directly to the user:
5. Select Attach existing policies directly
6. Search for the ServerMigrationConnector policy and select the checkbox next to the policy:
7. On the next page, specify any tags if you use them in your organisation.
8. Review the settings and complete the wizard
9. Copy the Access key ID and the Secret access key to a secure location (password manager for example)
That’s the AWS user setup and ready to go.
Install the AWS Server Migration Service Connector
The SMS Connector is a simple OVA that you deploy to your vCenter Server.
The public download URL for the SMS Connector OVA is https://s3.amazonaws.com/sms-connector/AWS-SMS-Connector.ova
Once downloaded, import the OVA into your vCenter Server instance
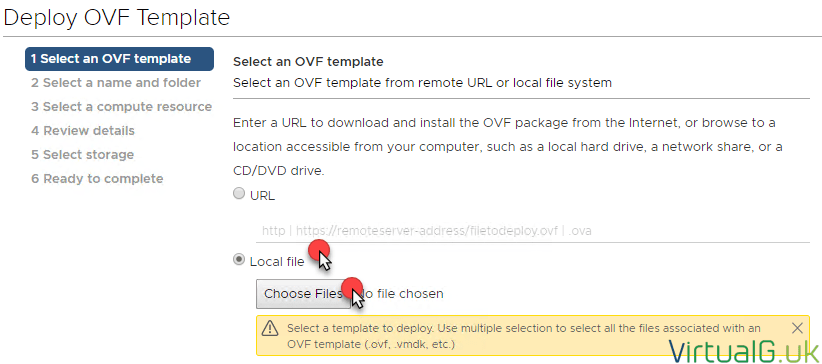
1. Right-click your cluster/host and select Deploy OVF Template:
2. Select Local file and browse for the file you downloaded earlier:
3. Hit Next, specify a name for the SMS Collector and a location
4. Choose a Compute location to run the Collector from then Next
5. For storage, you will need approximately 8GB of free space (if thin provisioned) or 300GB if thick provisioned. On the review screen hit Next
6. Select an appropriate datastore, remember to change the disk format to thin-provisioned if required.
7. Choose the correct network (one with access to your vCenter Server and the Internet)
8. Next, then Finish
Configure the AWS Server Migration Service Connector
After a successful deployment of the OVA, power on the Virtual Machine and open the console to find the IP address of the appliance (This will be a DHCP address if DHCP is available on the specified network from earlier)
To change the IP address you need to open the VM’s console
Login to the AWS Server Migration Service Controller with the default username and password:
- Username: ec2-user
- Password: ec2pass
Run the following command
- sudo setup.rb
Select option 2 and follow the prompts to view the current IP address and / or modify it.
Once you have a valid IP address, open the WEB UI at https://IPADDRESS
1.Follow the wizard
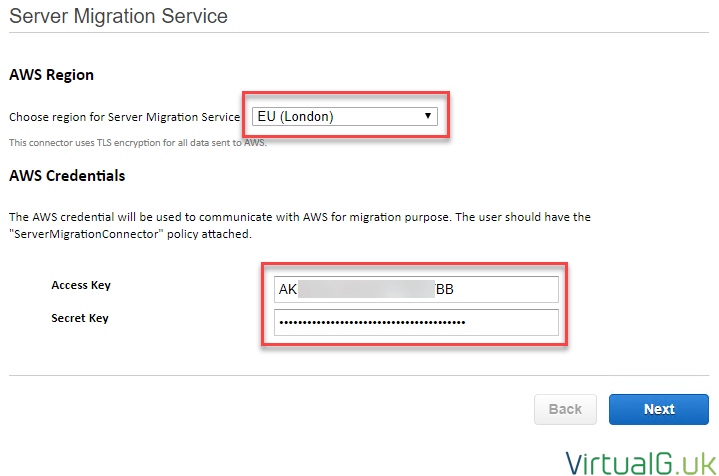
2. When you get to the AWS region option, select the AWS region that you want to migrate resources to. For me, this is EU (London)
3. For the AWS Credentials, type the Access Key and Secret Key that created earlier in the pre-requisites.
Note: In the environment, I was installing this appliance into, I was getting the rotating icon for a long time (more than 5 minutes) I believe this was the UI timing out, so I opened the Web UI again at: https://IPADDRESS and it brought me back to step 5. I entered the credentials again and it proceeded:
4. For simplicity, the VMware account could be an account with Administrator rights to your vCenter Server. If you cannot give such rights for any reason, create a new role within vCenter Server with the following permissions and assign to datacenters with propagate enabled. Be sure to apply no access to the role on any objects that you do not wish for the service to see (Hosts and clusters for example)
- Datastore.Browse
- Datastore.FileManagement
- Host.Config.SystemManagement
- VApp.Export
- VirtualMachine.State.CreateSnapshot
- VirtualMachine.State.RemoveSnapshot
5. Enter the FQDN of the vCenter Server, the Username and Password
NOTE: Ensure the FQDN is entered as an A record within your internal DNS infrastructure. To test that the appliance can resolve it to an IP address, try to ping the FQDN from the console. The checkbox for “Ignore hostname mismatch and expiration errors” might be a useful option to consider, depending on how healthy your certificate setup is.
Accept the vCenter Server certificate and continue to see the Connector listed in the dashboard:
Setup Migration Jobs
Now that we have the main setup out of the way, let’s take a look at the interesting part, setting up the Migration jobs:
NOTE: If using one-time migration, it’s a very good idea to power down the source Virtual Machines at this time. This prevents any new data being written to the VMs during the replication process and therefore prevents any data loss during the switchover process.
1. From your AWS account, open the Server Migration Service page:
2. Select the 1 running collector and hit the Import Server Catalog button to display all accessible Virtual Machines:
3. Once completed, you can select one or many Virtual Machines from your vCenter Server for migration.
4. Next select “Create Replication Job(s)”
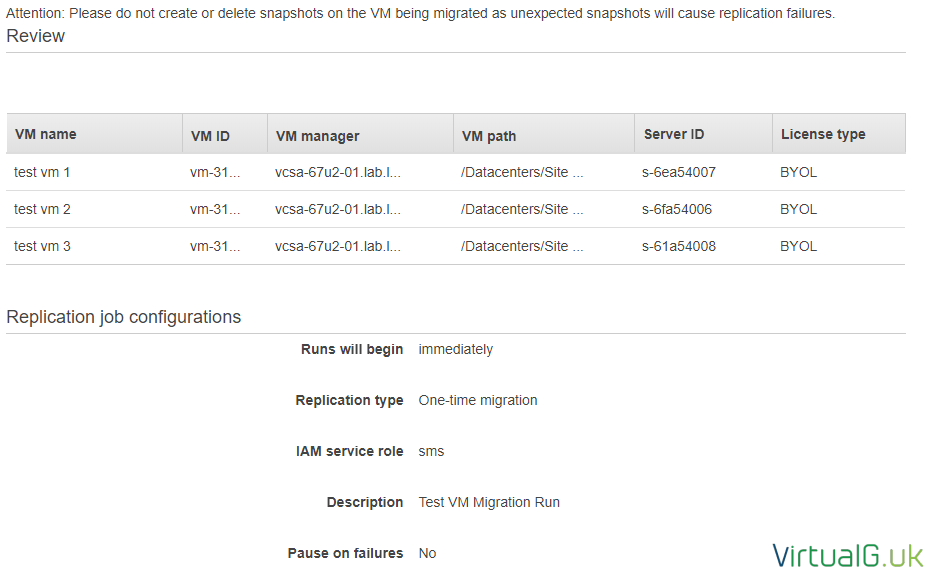
NOTE: In this example, I am migrating 3 Virtual Machines into AWS
5. Next to each Virtual Machine, specify the license to use. Licensing always results in a long discussion. These Virtual Machines can be licensed with my own licenses on the AWS cloud platform, so I select BYOL (Bring Your Own License) If in doubt, please be sure to seek advice from AWS and your Operating System Vendor / Partner.
6. You may have already noticed that the AWS Server Migration Service can be used as a replication tool to replicate your VMs from Your VMware stack to AWS. Since we are planning to migrate my VMs now, I simply select one-time migration.
7. I’m running the migration right away, but if you prefer, you can schedule the migration for a later date by changing the values for Start Replication Run.
8. I do not want to delete any AMIs that are created (After all, in this example, we are only replicating once so I won’t have any that I need to delete)
9. The other settings can be changed at your leisure.
10. Hit Next, review and the Create to begin.
Upon submitting the replication jobs, I initially had an issue with this error: “The service role does not exist or hasn’t been granted permission for the service to use” I was able to fix it by going to IAM and creating a new role named SMS with the ServerMigrationServiceRole policy attached to it. I then just specified SMS on the role option when creating the replication jobs.
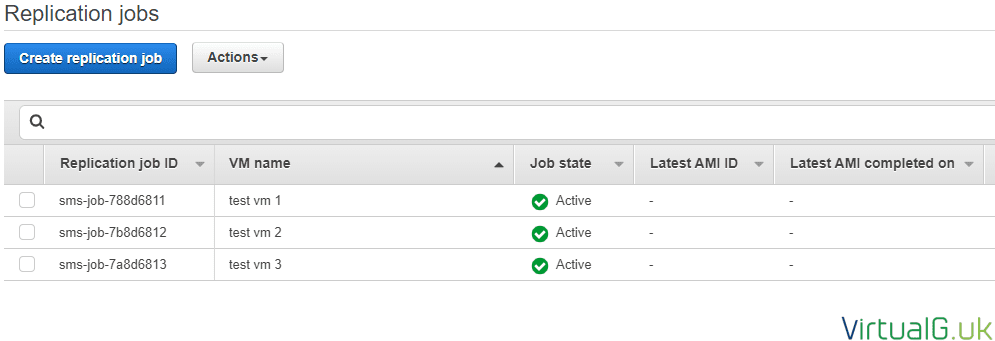
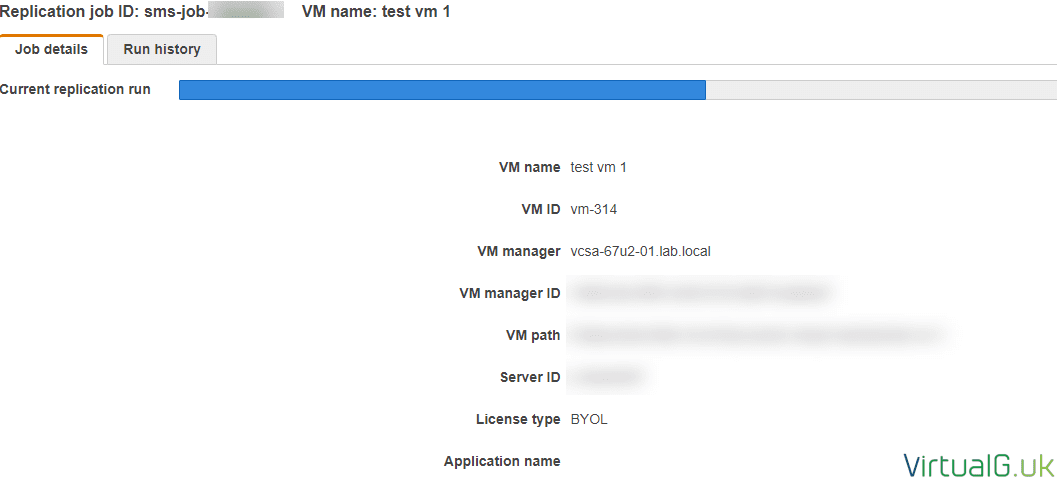
11. Now that the replication jobs are running, you should see something like the below in your Replication Jobs page:
Selecting one of the jobs will give you a status and some more information:
What’s happening under the hood?
In the most basic terms, the AWS SMS Connector creates a snapshot of the source Virtual Machine(s) and replicates the data into an AMI (Amazon Machine Image) You can see this in action below:
VMware vSphere Client View (Snapshots being taken)
AWS EC2 View (AWS AMI’s being created)
You won’t see any EC2 AMIs being created until replication is near completion. Depending on your infrastructure and bandwidth, this may take some time.
One thing I notice is that even after all the data is with AWS, it takes quite some time on the “Creating AMI (Step 4/4)” replication stage.
Converting a Replication into an EC2 instance (And getting it working)
1. Once you have a successful replication in a complete state, navigate over to your Replication Jobs page and select a replication Job.
2. In the bottom pane, open the Run History Tab.
3. For every replication, you will see an AMI ID and a “Launch Instance” button. Select this button for the Replication you wish to deploy as an EC2 instance.
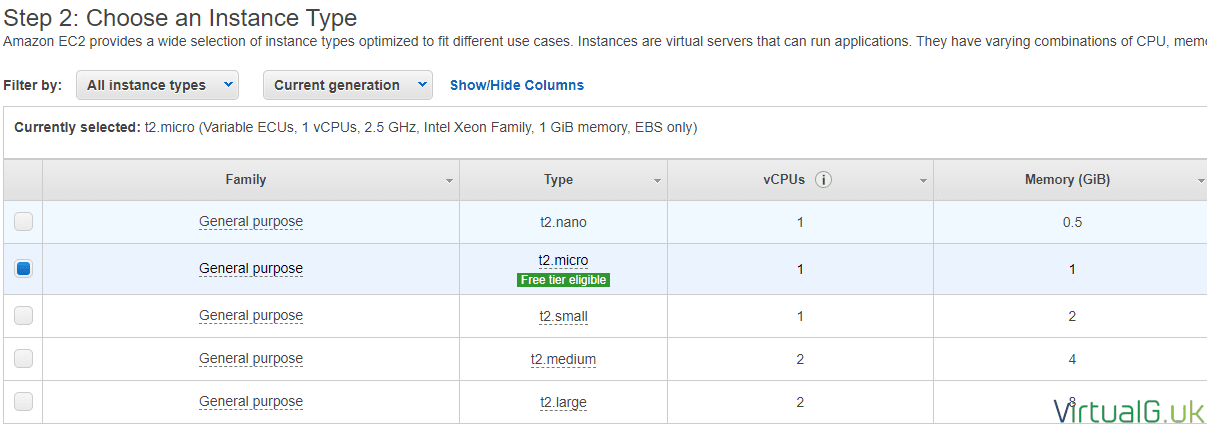
Now the familiar AMI wizard opens up:
4. Select the EC2 Instance Type to use for this replicated Virtual Machine. (This will determine your CPU, Memory and a corresponding cost)
5. Next, specify how many copies of this Virtual Machine to launch. For a replicated VM, 1 would usually be the correct number here.
6. Here you need to specify various networking information (See the IMPORTANT NOTE at the end of this section regarding this)
7. Populate the other instance-specific details on this screen.
8. For storage, this will already be configured with the same amount of storage that the VM had at the source, but you can change it here and also the type of storage for various performance purposes.
9. Add any tags that you may require for management purposes.
10. You will need to specify an existing, or create a new security group, just as you would if deploying any AMI within AWS.
11. Finally, review and launch!
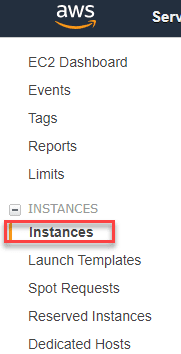
12. You can view your new instance within the EC2 page, under Instances:
Don’t forget to disable any Replication jobs that you no longer need. While the Server Migration Service is free to use, you will be billed for all data that you import.
IMPORTANT NOTE: For almost all migrations there will be some extra tasks such as reconfiguring new networking information inside the new EC2 instance(s), assigning them a new or existing security group and network. You will also need to consider Backup and other DR options. I’ve found that some customers also like to re-architect their EC2 instances into native AWS services after some settling down period but this is all beyond the scope of this post.
I highly recommend completing several trial runs to first become familiar with the process and most importantly, ensure all steps are documented for your specific environment.


